Monday, March 30, 2009

Migas

When I read on The Pioneer Woman’s blog that one of her favorite foods is Migas; I was intrigued. I had never heard of Migas, but I am very fond of Mexican and Tex Mex food, so it was worth a try. I like to order the Mexicali scramble from a local restaurant, so I thought this might be a good home-cooked version. Wow, this recipe was nothing like Mexicali scramble, which can be heavy with beans, cheese and sour cream. Migas is light and fresh with peppers, onions and tomatoes. The corn tortillas add a nice texture, and the cheese adds a subtle richness. I cooked and crumbled some chorizo to serve on the side, but next time I will cook and drain the chorizo, and fold it in with the cilantro. I thought Migas was a complete meal in itself, but you could serve it with black beans and tortillas.

Migas
From Pioneer Woman
4 corn tortillas
Canola oil, to fry tortillas
12 large eggs
¼ half & half (I didn’t have any half & half so I used heavy cream)
1 Tablespoon olive oil
1 Tablespoon butter
1 medium onion, roughly chopped
1 red bell pepper, roughly chopped
1 green bell pepper, roughly chopped
4 plum tomatoes, roughly chopped
1 or 2 jalapenos, seeded and finely diced
½ cup chopped cilantro
1 cup grated Cotija cheese (you can also use Monterey Jack, but I used the Cotija)

Heat the canola oil in a small skillet over medium heat, and fry the corn tortillas just until crisp, but not browned. Drain the cooked tortillas on a paper towel. Chop the tortillas in one-inch pieces and set aside.

Break the eggs into a small bowl, and whisk together with the half & half. Season with salt and pepper and set aside.

Add the olive oil and butter to a large skillet over medium high heat to melt the butter. Add onions and bell peppers and cook until softened and starting to brown. Add the jalapenos and the tomatoes and stir between each addition. Then, add the tortillas and stir gently to combine.

Reduce the heat to medium, and pour the egg mixture into the pepper mixture. Cook slowly, and gently fold the mixture as it cooks. Add the cheese and the cilantro when the mixture is still moist on the top, and stir to combine. Remove from the heat, and serve.

Sunday, March 29, 2009

Cupcakes

Sunday was a beautiful spring day, so we decided to go on a field trip. I have wanted to see the store Tyler Florence opened in Mill Valley for a while now, so we headed across the Golden Gate Bridge to check it out. Tyler’s store was interesting. No, he wasn’t in the shop while we were there, but I will share our visit to his store in another post.

We had lunch at Pearl’s Fat Burger. My avocado burger was the best burger I’ve had in a long time. Across the street from Pearl’s is the Frosting Bake Shop, which specializes in cupcakes. The inside of the shop is brightly painted with pink and orange stripes, and black and white polka dots. The cupcakes are charmingly displayed in covered cake stands, and they came in really fun flavors—Black and White, Red Velvet, Chocolate Obsession, 24 Carrot, Juliana Banana, Lemon Twist, Razzleberry, Willie Vanillie, Cookies and Cream, ummMocha, and Peanut Butter Bliss. Did you guess which flavor I tried?

While I enjoyed my cupcake immensely, I really liked the cake bites. I told you about cakeballs in my last post. Well, cake bites are Frosting’s cakeballs. They make cake bites by mixing cake and frosting into balls, and then dipping the balls into chocolate. The flavor of the cake bites is remarkable. The cake bites reminded me a little of truffles, but they were lighter and less dense. The shop does mail order if you want to try cake bites without making a batch of cake balls.

Thursday, March 26, 2009

Thursday Links

I was excited to read in this month's Everyday Food they have a collection of lemon dessert recipes on the web. I can’t wait to try some of the recipes. You know how I feel about lemon!

Pioneer Woman featured Bakerella’s cakeballs. They are really cute, but they do remind me a little of the Wonder Bread balls of my youth. Don’t ask. They were gross. But, the cakeballs don’t look gross at all; in fact, I might have to try them for my son’s birthday next month.

If cakeballs aren’t your thing, you might want to check out the New York Time’s recipe for Whoopie Pies. A blast from the past much better than my Wonder Bread balls!

Did you happen to catch 60 Minutes with Alice Waters of Chez Panisse fame on March 15? Lisa at A Dinner Party really hits the nail on the head with her post about the spot. I happened to tune in just in time to catch Alice Waters. She was all about everyone eating healthy and organic food, but she seemed a little out of touch. I got the impression she didn't understand or didn't care how expensive it is to eat organic.

She invited Leslie Stahl to her home for a home cooked breakfast to demonstrate how easy it is to cook with local, sustainable and organic food. Breakfast looked beautiful, but I had to laugh when she broke an egg into a copper spoon, and cooked the egg over a blazing fire in the brick oven in her kitchen. I could only think that if I tried to cook eggs like this (camping anyone?), two eggs would have ended up on the floor, one in the oven, and I would've been lucky to have one egg to show for my efforts. Talk about slow food!

My other thought was that I hope she didn’t cook this on a Spare the Air Day, because, sheesh, how embarrassing to be fined for polluting the air when you’re trying to cook a healthy and organic breakfast on national television.

Tuesday, March 24, 2009

Parmesan-Crusted Chicken

I wasn’t going to post a recipe tonight. I have a post with some interesting links (I was actually supposed to post the links last Friday), but they can wait another day. After I made dinner tonight, I knew I needed to give you this recipe. Yes, it was that good.

If you are anything like me, you’ve probably made breaded baked chicken at least a million times. Parmesan-Crusted Chicken from Fine Cooking's Make It Tonight is probably the best I’ve tasted. The mustard coating under the bread crumbs was delicious.

I was afraid the Dijon mustard would overpower the rest of the ingredients, but it didn’t. The mustard mellowed to a tangy flavor under the bread crumbs. The kids enjoyed the chicken, and it was really easy. I served the chicken with some roasted asparagus and couscous. Yum, yum!

Parmesan-Crusted Chicken
Adapted from Fine Cooking’s Make It Tonight

4 boneless, skinless chicken breast halves
6 Tablespoons Dijon mustard
1 Tablespoon white wine
¾ teaspoon salt
¼ teaspoon freshly ground pepper
1 cup freshly grated Parmesan cheese
1 cup of fresh bread crumbs, I used ½ small loaf of ciabatta bread
4 Tablespoons melted butter

Preheat the over to 450° F. Whisk together the mustard, wine, salt, and pepper in a shallow bowl, and add the chicken. You can hold the chicken in the mustard mixture for up to 2 hours in the refrigerator or use immediately. Mix the cheese, breadcrumbs and melted butter on a large plate, and toss until well combined. Take the chicken breasts out of the mustard one at a time, and place them in the breadcrumb mixture. Coast the breast with the breadcrumbs, and place on a buttered baking sheet. Roast the chicken until the coating is crisp, brown and the breasts are cooked through 25-30 m

Monday, March 23, 2009

Upside-Down Strawberry Tart

While I was driving home from work last Thursday, I was trying to figure out what to serve for dessert Friday night. Strawberries are the fruit I crave most during winter, and since Friday was the first day of spring, I knew my dessert had to feature strawberries. I also knew I wanted to use mascarpone cheese in some way. I wanted refreshing and light, but I didn’t have a vision. When I got home from work, I saw my new Gourmet (4/09) magazine on the table. And, do you know what was on the front? A strawberry tart with mascarpone cheese.

I knew I wasn’t going to have time to make the Gourmet dessert, but I did use the recipe as a jumping off point (I am definitely going to make this tart another time). I decided to use lime juice and zest in the cheese along with a small amount of vanilla. The vanilla in the mascarpone made the lime really stand out. Then, for the final touch, I crumbled ginger snaps on top for the “crust.” The lime and the ginger combination worked really well. The Upside-Down Strawberry Tart was the perfect ending to our meal.

Upside-Down Strawberry Tart
4 pints Strawberries, stemmed and quartered
1 Tablespoon granulated suger
8 ounces mascarpone cheese
1 lime
¼ cup confectioners sugar
½ cup heavy cream
¼ teaspoon vanilla
10 ginger snaps coarsely crushed

Place the strawberries in a bowl, and add the granulated sugar. Set aside. In another bowl, place the mascarpone cheese, and zest the lime, and add it to the cheese. Cut the lime in half, juice the lime and add it to the mascarpone. Add the vanilla to the mixture, and stir to combine all the ingredients. I added cream to the mixture to thin the cheese to the consistency of stiff whipped cream. Place the strawberries into individual serving dishes, and dollop with the cheese mixture. Top with the coarsely crushed, and serve. Serves 4-6.

Sunday, March 22, 2009

Vegetarian Tortilla Soup

I love tortilla soup, but I haven’t found a recipe I liked, until now. I was trying to find a good soup to serve to some girlfriends last Friday, and since it was during Lent, I needed a vegetarian soup. I must have found five or six different recipes for vegetarian tortilla soup, but I couldn’t find one that completely appealed to me. So, I took the elements I liked of each recipe, and combined them into the soup below.

I did a test run of the soup, and fed it to my kids first. (This is not something I usually do, but since I wasn’t sure how spicy the soup would be, I felt I should test it first.) My daughter liked the soup, but said it was burning her throat. My son ate it, but only because dessert was hanging in the balance. I thought the soup might be just a little too spicy, but when I took it to work for lunch the next day, the spiciness had mellowed just a bit.

If you would like less spicy soup, you can reduce the number of chipotle peppers, but don’t eliminate them entirely since the peppers impart a nice smoky flavor to the soup. I really like this soup, if I do say so myself. It tasted fresh and smokey, and did live up to my expectations. My girlfriends said they liked it too, and they all had seconds, so I assume they weren’t just being polite.

Vegetarian Tortilla Soup
1 onion, chopped
1 red pepper, chopped
3 cloves of garlic, minced
2 Tablespoons olive oil
1 Tablespoon paprika
1 teaspoon cumin
1 teaspoon chili powder
1 teaspoon oregano – I used Mexican oregano
4 chipotle peppers in adobo sauce, chopped (use fewer chipotle peppers for a less spicy soup)
2 14oz cans of fire roasted tomatoes
1 can full of water
1 ½ teaspoons kosher salt
2 quarts of vegetable stock
12 ounces frozen corn
1 14oz can of black beans, rinsed and drained
¼ cup chopped cilantro
Juice from 1 lime

Assorted Toppings
Tortilla chips
Shredded cheddar cheese
Sliced avocado
Chopped cilantro
Limes, Quartered

Heat the olive oil in a large soup pot. Add the onion, red pepper and garlic and cook until softened but not browned. Next, add the paprika, cumin, chili powder and oregano, and cook until fragrant, about 1 minute. Once the mixture is fragrant, add the tomatoes, vegetable stock, water, chipotle peppers, corn, black beans and salt.  Simmer the soup for about 20 minutes. After the soup has simmered, add the lime juice and cilantro and simmer for an additional 5 minutes. This soup tastes even better the next day.

To serve, crush some tortilla chips and place in the bottom of a soup bowl. Top the chips with avocado slices, cheese and cilantro, and ladle the soup on top of the chips and toppings. This soup serves six with leftovers.

Thursday, March 19, 2009

Milk-Chocolate Tart with Pretzel Crust

The minute I saw the Milk-Chocolate Tart with Pretzel Crust in Food & Wine, I knew I needed to make this recipe! Although, I enjoy dark chocolate, I have always loved milk chocolate, and this tart has a salty and sweet combination I also love.

Unfortunately, I had limited success with this tart. I followed the recipe as written, but the filling did not set correctly. When I cut into the tart, the filling oozed out the sides. Who tests recipes in magazines, anyway? I think if someone tested this recipe, they would have discovered the filling was much too loose. This can be easily resolved by adding more chocolate to the cream.

Don’t get me wrong, this recipe still tasted delicious. I took the tart to work, and there was only one small piece left at the end of the day. The pretzel crust worked really well with the milk chocolate. I have never creamed butter and sugar for a crust before, but it worked well. Now I've adapted this recipe to make the filling firmer, this tart is definitely worth a try!

Milk-Chocolate Tart with Pretzel Crust

Adapted from Food & Wine (2/09)

Crust
1 stick of unsalted butter, softened
1 ¼ cups coarsely crushed thin pretzels
¾ cup confectioners sugar
½ cup all-purpose flour
1 large egg
2 ounces bittersweet chocolate, melted

Filling
1 ½ cups heavy cream
1 pound milk chocolate, chopped
Sea Salt
Crushed Pretzels

Beat the butter and ¾ cup of pretzels and the sugar in a stand mixer on low speed until creamy, and add the flour and egg. Add the remaining ½ cup of pretzels. Flatten the dough between 2 sheets of plastic wrap, and chill for at least 30 minutes.

Once the dough is chilled, roll the dough out between two sheets of plastic wrap into a 12 inch round. Press the dough into a 10-inch fluted tart pan with a removable bottom. Trim the overhanging dough and chill for 30 minutes or until firm.

Preheat the oven to 350°. Once the dough is chilled, line it with parchment paper, and fill it with pie weights and bake for 30 minutes. Remove the pie weights and the parchment paper and bake for an additional 10 to 15 minutes. If the crust darkens too much, cover it with foil. Let the tart shell cool completely, and then brush the melted bittersweet chocolate over the bottom of the tart shell. Refrigerate until set, about 10 minutes.

To make the filling, bring the cream to a simmer in a small saucepan. Take the cream off the heat, add the milk chocolate and let the mixture sit for 5 minutes. After the 5 minutes is up, whisk until smooth. Transfer the filling to a bowl, and let cool for one hour. Pour the filling into the tart shell, and refrigerate until set. Sprinkle with sea salt, crushed pretzels and serve.
Wednesday, March 18, 2009

Blueberry Muffins

I don’t know about you, but I can only take so much corned beef and cabbage. I had it twice this week, and although I enjoyed every bite, I am ready for something a little healthier.

Now, I know I’ve been a little obsessed with muffins lately, but this muffin recipe is different. It’s healthy! Or, maybe I should say healthier. I first made this recipe back in 1990. It's from Sunset’s Light & Healthy Cookbook. These muffins are made with half all-purpose flour and half whole wheat flour and canola oil, so they are on the healthier side. I hadn’t made this recipe in years, and for a moment while I was mixing the ingredients, I thought there was a misprint in the amount of cinnamon I should include. But, I didn’t remember having a problem in the past, so I forged ahead. The amount of cinnamon in the muffins is perfect. The whole wheat flour creates a more dense and chewy muffin, and the cinnamon adds a nice depth of flavor. These muffins taste even better the next day.

Blueberry Muffins

Adapted from Sunset’s Light & Healthy Cookbook
1 ½ cup all-purpose flour
1 ½ cup whole wheat flour
1 cup plus 2 Tablespoons firmly packed light brown sugar
2 teaspoons baking soda
4 teaspoons baking powder
1 Tablespoon cinnamon
¼ teaspoon salt
2 eggs
1 ½ cup lowfat buttermilk
¼ cup canola oil
2 cups of fresh or frozen blueberries

Preheat the oven to 375 °. Mix together the whole wheat flour, all-purpose flour, 1 cup sugar, baking soda, baking powder, cinnamon and salt. In another bowl beat the eggs and buttermilk. Stir the egg mixture into the flour mixture just until moistened. Add the blueberries stirring gently and briefly to mix them into the batter. Spoon the batter into greased muffin cups (you could also use foil liners). The original recipe called for filling the muffin cups almost full, but I filled the muffin cups about two-thirds full. Sprinkle the remaining 2 tablespoons of sugar on top of the batter. Bake for 20-30 minutes until well browned and a toothpick comes out clean. Remove from pan and cool muffins on a cooling rack. Makes 12-15 muffins.

Monday, March 16, 2009

Grandma Lynn’s Traditional St. Patrick’s Day Feast

I should title this post “Grandma Lynn’s Traditional Non-Traditional St. Patrick’s Day Feast,” since her meal is anything but a traditional boiled dinner. Who is Grandma Lynn you ask? Well, this is a little complicated. She is my children’s grandmother, she is my father’s wife, and technically, I suppose, she is my stepmother. The stepmother title is strange to both of us since she and my father met and married after my husband and I got married. So, I mostly think of Lynn as a dear friend and a wonderful cook!

She began her tradition over 25 years ago, when she decided to host a St. Patrick’s Day party, but she wanted to serve something fresher and tastier than the traditional boiled corned beef and cabbage. So, she gathered recipes, adapted most of them beyond recognition, and hosted her party. When she joined our family, she still hosted her large group of friends, but she included us as well. She made one other change to her tradition—She incorporated our recipe for potato casserole to her meal (after she changed it for the better of course).

She hosted my family last night for a scaled back version of her party. She didn’t scale back the food, but since my dad hasn’t completely recovered from some health problems, she invited family only. Once my dad recovers completely, she plans to invite her friends back for this great dinner. I watched, took notes, and copied all of her recipes last night, so I could share them here. Enjoy!
Baby Carrots and Dill
3 bunches fresh baby carrots or 4 cups cut-up carrots
2 to 3 Tablespoons butter
½ cup brown sugar
1 12-ounce bottle of Guinness beer
2 Tablespoons chopped dill

Scrub and peel carrots leaving 1-inch of the green tops on the baby carrots (if using). Melt the butter in a medium saucepan and add the carrots. Sauté the carrots for 1-2 minutes. Add the brown sugar and the bottle of beer. Simmer until the carrots are tender. Drain the liquid from the carrots and add the dill and another pat of butter. Toss to coat the carrots and serve.

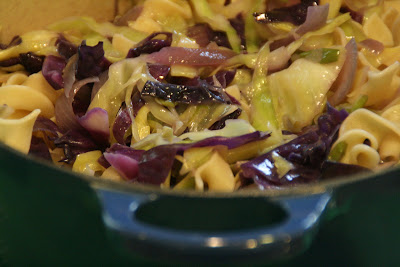
Cabbage and Egg Noodles
1 head green cabbage
1 head red cabbage
1 red onion, chopped
2 teaspoons sugar
2 Tablespoons olive oil
2 Tablespoons butter
Salt and pepper to taste

Cook egg noodles according to package directions. While the noodles cook, slice cabbage and cut into 1-inch pieces. Heat butter and oil in a large saucepan, and sauté cabbage and onion. Add sugar and season with salt and pepper. Sauté cabbage until tender. Drain noodles, and toss with cabbage. Add more butter if needed.

Potato Casserole
6 medium potatoes
¼ cup of butter, melted
3 cups shredded cheddar cheese (Lynn uses Dubliner cheddar cheese)
2 cups sour cream
½ cup chopped green onions
1 teaspoon salt
½ teaspoon white pepper

Boil potatoes in skins. Cool the potatoes then peel them. Grate the potatoes into a large mixing bowl. Add butter, cheese, sour cream, onions, salt and pepper into the potatoes and mix lightly to combine. Turn potatoes into a 2-quart casserole dish. Dot with butter, and bake at 350° for 45 minutes. Serves 8.

Corned Beef
2 3-pound corned beef briskets
1 tablespoon pickling spices
2 12-ounce bottles of Guinness beer

Corned Beef Glaze (see recipe below)

Rinse the corned beef with cold water. Put the corned beef in a large stockpot, and cover with cold fresh water. Bring to a boil, and boil for 5 to 7 minutes. Remove the stockpot from the heat, and drain and remove the corned beef and set aside. Clean the stockpot. Place the corned beef back into the stockpot, and cover with fresh water. Add the pickling spice, and bring the corned beef to a boil. Turn down the heat to simmer. Add Guinness to the water (watch so this does not boil over). Simmer the corned beef 1 hour per pound. Once the corned beef has finished boiling, remove and place into a large roasting pan, and let stand while you are preheating the oven to 375°. Pour the glaze over the beef, and cover with foil. Cook for 15-20 minutes or until the glaze is caramelized.

Corned Beef Glaze
½ cup Dijon mustard
½ cup honey
1/3 cup sherry wine vinegar
1/3 cup brown sugar
1 teaspoon sesame oil

Combine ingredients in a small saucepan and bring to a boil. Simmer for 8 minutes whisking to combine.

Sunday, March 15, 2009

Irish Soda Bread


With St. Patrick’s Day coming up on Tuesday, I decided to try making Irish Soda Bread. Epicurious has an article about how the Irish Soda Bread we make here is not what they eat in Ireland. I figured as much. I worked with a guy from Ireland who looked amused when I asked him if he ate corned beef and cabbage in Ireland. He patiently explained they eat a boiled bacon dinner, but corned beef was a purely American invention. Authentic or not, I decided to forge ahead with my soda bread. I did some research, and came up with a couple of recipes, and because I care about you, my readers, I didn’t test just one recipe of soda bread, but two.


The first recipe I tried was sent to my by a coworker. This soda bread recipe resembles a quick bread or muffin recipe, and it was too wet to knead it or shape it, so I poured the mixture into two loaf pans to bake. The bread came out moist and tasty.

Irish Soda Bread
5 cups sifted all-purpose flour
¾ cup sugar
2 teaspoons baking powder
1 ½ teaspoons salt
1 teaspoon baking soda
¼ pound butter (1 stick)
2 ½ cups mixed light and dark raisins
3 tablespoons caraway seeds
2 ½ cups buttermilk
1 large egg, slightly beaten

Preheat oven to 350° F, and generously butter 2 (9 X 5 inch) loaf pans. Stir together flour, sugar, baking powder, salt and baking soda. Cut the butter into the flour mixture and mix until it becomes grainy. Add the raisins and caraway seeds. Mix the egg and buttermilk together, add it to the flour mixture, and stir just until moistened. Don’t over mix. Pour into the two prepared loaf pans, and bake for 30-40 minutes, or until a toothpick come out clean. Cool in the pan for 3-4 minutes and then remove and transfer to a wire rack to cool.


Epicurious.com also has a nice video on how to make Irish Soda Bread. The recipe they include with the video is not the same recipe Chef Eric Kastel demonstrates, so I adapted the recipe to be more in line with his recipe. This bread was equally as tasty, but it was drier with a crisper crust than the first batch of soda bread.

Irish Soda Bread
I adapted this recipe from an Epicurious recipe.

4 cups all-purpose flour
1 tablespoon baking soda
½ cup sugar
¼ teaspoon salt
¼ pound unsalted butter
1 cup of light and dark raisins
1 tablespoon caraway seeds
1 cup buttermilk

Preheat oven to 400° F and grease a baking sheet and sprinkling it with cornmeal. Sift the flour, baking soda, sugar and the salt together into a large bowl. Cut the butter into the flour mixture until it becomes grainy. Add the raisins, the caraway seeds and the milk. Mix until just combined. Once the dough comes together, turn the dough onto a lightly floured surface. Press the dough into a ball, and cut the dough into two equal pieces. Shape the dough into a ball, cut an X into the top of the ball, and sprinkle with a small amount of flour. Bake the soda bread until lightly browned and hollow sounding when you tap it on the bottom about 20-25 minutes. Wrap the bread in a tea towel directly out of the oven. Cool the soda bread in a tea towel on a wire rack before serving.

Wednesday, March 11, 2009

Roasted Chicken Thighs with Potatoes, Artichokes and Lemon

I like to plan a week’s worth of meals during the weekend, so I can go shopping on Saturday or Sunday (I like to do this, but it doesn't always happen). I then have everything ready to cook when I get home during the week, and I don't have to stop at the store. When I can plan like this, weeknight meals seem so much easier.

I am always looking for inspiration, so we don't have tacos and spaghetti every week. I picked up Fine Cooking’s Make It Tonight magazine. (With all of the cookbooks and magazines I already have, it feels a little obsessive to bring home yet another cooking magazine, but I did it anyway. I think it might be a sickness, but I’ll have to work that out later.) One of the recipes in Make It Tonight that caught my eye was the Roasted Chicken Thighs with Potatoes, Artichokes and Lemon. I love artichokes, and you already know how I feel about lemon, so this recipe looked great.

I can’t believe how easy this recipe was to put together. It took about 45 minutes total time to cook, but I could leave it for most of that time to get some things on my to-do list accomplished. I loved this whole dish. My husband and daughter didn’t like the vinaigrette on top of the artichokes, but they didn’t mind it on the rest of the dish. I thought the vinaigrette finished off the dish nicely.

Roasted Chicken Thighs with Potatoes, Artichokes and Lemon
¼ plus 3 Tablespoons extra-virgin olive oil; more for the baking sheet
4 to 6 bone-in, skin-on chicken thighs
Kosher salt
Black pepper
1 package frozen artichoke hearts, 10 ounce
1 lemon
1 pound small potatoes, such as fingerling or baby Yukon Gold, those over 2 inches cut in half
4 small sprigs of thyme
Flat-Leaf parsley for garnish

Preheat over 450°. Lightly oil a heavy duty rimmed baking sheet. Put the chicken on the baking sheet and season with salt and pepper. Leave plenty of room between the chicken thighs. Bake for 15 minutes. Meanwhile, rinse the artichokes in a colander to partially thaw, and drain. Thinly slice half the lemon and juice the other half. Place 4 teaspoons of the lemon juice in a small bowl, whisk in the 3 tablespoons of olive oil, and season with salt and pepper. Combine the artichokes, potatoes, lemon, thyme and the ¼ cup of olive in a large bowl. Mix to coat the ingredients. Add 1 tsp of salt and a few grinds of pepper. After the chicken has cooked for 15 minutes, remove it from the oven and add the artichoke mixture. Spread the mixture out on the baking sheet keeping the lemon slices toward the middle, so they don’t burn. Continue roasting for another 30 to 40 minutes, or until the chicken is cooked through and the potatoes are tender. Divide the chicken and the vegetables on plates and drizzle with the lemon vinaigrette, and sprinkle with parsley. Serves 4 to 6.

Tuesday, March 10, 2009

Macaroni and Cheese

I mention in my profile my 8-year-old son only likes steak and macaroni and cheese. What I don’t mention is he doesn’t like just any macaroni and cheese. In fact, he won’t eat boxed macaroni and cheese at all. No, he will only eat my stove top macaroni and cheese. Lucky for me, the stove top version takes only about as much time as the boxed macaroni and cheese.

Stove Top Macaroni and Cheese
This recipe is adapted from an Alton Brown (Good Eats) recipe.

2 ½ cups of elbow macaroni
4 tablespoons butter
2 eggs
6 ounces evaporated milk
¼ teaspoon Tabasco sauce
1 teaspoon kosher salt
½ teaspoon dry mustard
10 ounces sharp cheddar cheese, shredded

Cook pasta in a large pot of salted boiling water. While the pasta is cooking, whisk together the eggs, milk, Tabasco, salt and mustard. When the pasta is cooked to al dente, drain and then return the pasta to the pot, and add the butter stirring to melt the butter and coat the pasta. Stir the egg mixture into the pasta and add the cheese. Cook over low heat while continuing to stir for three minutes or until creamy. Serves 6

The next macaroni and cheese recipe was my mother-in-law’s recipe, and I’m not sure where she got it. My son eats this macaroni and cheese only grudgingly. I think his aversion comes from when he was three-years-old and in preschool. The teachers at his school were nice enough to heat his lunch, so he was able to eat a hot lunch everyday. So, I packed this macaroni and cheese for his lunch one day, and sent him on his way. That evening, I asked him how he liked his lunch. He ran and got his lunch box and said to me, “I didn’t eat it. There was sand in my macaroni and cheese.” He opened the container, and showed me the macaroni and cheese with the breadcrumbs on top. He thought the breadcrumbs were sand. I laughed until I realized the poor guy didn’t get anything to eat for lunch. I think this experience changed him. To this day he doesn’t like baked macaroni and cheese because of the breadcrumbs. The rest of the family doesn’t share his aversion, so I make this recipe every so often, and I scrape the breadcrumbs off his portion.

Creamy Macaroni and Cheese
1 lb elbow macaroni (I use the giant elbows for this recipe)
¼ cup butter
6 tablespoons flour
1 teaspoon salt
4 cups milk
4 cups grated sharp cheddar cheese

Topping
2 slices of sandwich bread
2 tablespoons butter, melted

Preheat the oven to 350°. Cook pasta using package directions. Melt butter in a large pot. Add the flour and mix until combined and cook for a minute or two. Whisk milk in slowly, and cook until thickened. Add the salt and cheese and stir until combined. Add the drained pasta, and pour into a greased 9x13 dish. For the topping: Place the bread into a food processor and pulse until you have breadcrumbs. Mix the 2 tablespoons of melted butter into the breadcrumbs, and sprinkle on top of the macaroni and cheese mixture. Place the macaroni and cheese in the preheated oven, and cook for 20-30 minutes or until heated through and bubbly.

Sunday, March 8, 2009

Muffins Again

We did not get any rain this Sunday, but I did make muffins again. The kids enjoyed having muffins for snacks last week, so I decided to dust off an old muffin cookbook, and try a different recipe. Muffins by Elizabeth Alston has some delicious looking muffin recipes like lemon and ginger, pecan orange and pumpkin chocolate chip, but I chose the apple streusel for my Sunday muffin adventure. This was an easy recipe, and I had everything I needed on hand. The apple streusel muffins were light and delicate tasting, and I liked the added flavor and crunch of the streusel.
Apple Streusel Muffins

Topping
½ cup chopped walnuts
¼ cup all-purpose flour
3 tablespoons granulated sugar
2 tablespoons unsalted butter, at room temperature
¼ teaspoon ground cinnamon

Batter
1 ½ cups all purpose flour
½ cup granulated sugar
2 teaspoons baking powder
1 teaspoon ground cinnamon
¼ teaspoon ground allspice
¼ teaspoon baking soda
¼ teaspoon salt
2 large eggs
1 cup sour cream
¼ cup unsalted butter, melted
1 cup diced unpeeled Granny Smith apple

Heat oven to 375°F. Grease muffin cups or use foil baking cups. In a small bowl, mix the topping ingredients with a fork until mixture resembles chopped walnuts. In a large bowl, combine the flour, sugar, baking powder, cinnamon, allspice, baking soda, and salt. Whisk to completely blend all ingredients. In another bowl, add eggs, sour cream and melted butter, and whisk until well blended. Stir in the diced apples. Pour the egg mixture over the flour mixture and stir just until combined. Scoop batter into the prepared muffin pans, and top each muffin with about 2 teaspoons of the streusel topping. Bake 20 to 25 minutes until browned, or when a toothpick inserted into the center comes out clean. Remove muffins from the pans and let cool at least 1 hour before serving. Makes 15-20 muffins.

Thursday, March 5, 2009

Apple Tart

I really enjoy Molly Wizenberg’s blog Orangette. I think I’ve mentioned before she could make braised rocks with a side of gravel sound delicious and something I would like to make. Luckily, her recipes are more edible than rocks. When my Bon Appétit comes in the mail, I always turn first to her column The Cooking Life to read her story and recipe.

The Apple Tart Cake Molly featured on her blog was perfect for my friend’s birthday last week. I can see why Molly had a hard time describing the dessert. She couldn't decide whether it was cake or a tart. It seemed more like a tart than a cake to me. The crust was cookie like in its texture, and the apples were soft and sweet on top of the crust.

The tart was easy enough to pull together on a weeknight, but the result was like a weekend dessert. And, everyone at work raved about it. My husband and kids were disappointed they didn’t get a chance to have any, so I will have to make the tart again. Please…like it’s going to be a hardship to make this lovely tart again! I can’t wait.

Tuesday, March 3, 2009

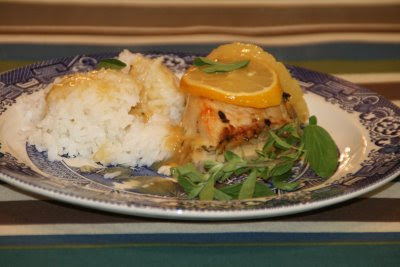
Lemon Pineapple Chicken

So, did I tell you I love lemon? I did? Well, okay, then I will share another lemon dish that is also a quick weeknight meal. A friend I worked with gave me this recipe years ago. I have been making it on and off since she passed it along to me.

When I first made Lemon Pineapple Chicken, I used dried rosemary, and the flavor of the rosemary took over. I kept using less and less dried rosemary each time I made the recipe until I stopped making it all together. It was only when I moved to my new house with a rosemary bush in the backyard that I decided to try the recipe again. I used the fresh rosemary from my bush instead of dried, and it made a huge difference. Gone was the woody overpowering taste, and it was replaced by a mellow herb flavor that compliments all of the other flavors. The recipe shines with the fresh rosemary.

Now, don’t be fooled by the name of this recipe. Despite the pineapple and lemon, the sauce is not sweet. The garlic, rosemary, mustard and Worcestershire sauce work together to keep the sauce from being cloyingly sweet.

I also added a can of pineapple juice to the recipe, because I like to have plenty of sauce to pour over my rice, but you could add more lemon juice or even orange juice.

Lemon Pineapple Chicken
Adapted from my friend Vicky’s recipe

1 20oz. can sliced or chunk pineapple
4 tablespoons lemon juice
1 6oz can pineapple juice
1 teaspoon kosher salt
3 cloves garlic (crushed)
2 teaspoons fresh rosemary
2 teaspoons Dijon mustard
2 teaspoons Worcestershire sauce
3 tablespoons cornstarch
1 small lemon thinly sliced
4 chicken breasts

Preheat the oven 400°. Drain the pineapple and reserve the juice. Combine pineapple juice, lemon juice, salt, garlic, rosemary, mustard, Worcestershire sauce and cornstarch. Pour the sauce over chicken reserving a small amount of sauce for the end. Bake for 25-30 minutes or until cooked through. Place pineapple and lemon slices on top and around chicken, and pour in the rest of the sauce. Bake 5 minutes longer.

Sunday, March 1, 2009

Rainy Sunday Afternoon


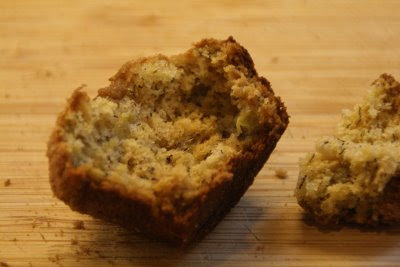
What should you do on a rainy Sunday afternoon? Why, bake muffins, of course. That’s what I did with my Sunday afternoon at least. I had six brown spotted bananas no one in my family would eat, and my freezer was already full of what my husband calls our “banana sacrifices.” So, I had no choice but to bake with bananas. I decided to bake a batch of Banana Crumb Muffins. I printed this muffin recipe from Allrecipes.com back in 2002 (I know only because the date is on the bottom of the recipe). I remember making these muffins once before, but after tasting them again today; I wonder why I have any banana sacrifices in my freezer at all. These muffins are fast, easy and tasty.


Banana Crumb Muffins
Adapted from a recipe from allrecipes.com

3 cups all-purpose flour
2 teaspoons baking soda
2 teaspoons baking powder
1 teaspoon salt
6 bananas, mashed
1 ½ cup granulated sugar
2 eggs, lightly beaten
2/3 cup butter, melted

Topping
2/3 cup packed brown sugar
¼ cup all-purpose flour
¼ teaspoon ground cinnamon
2 tablespoons butter

Preheat the oven to 375° and lightly grease 20 muffin cups. In a large bowl mix together flour, baking soda, baking powder and salt. In another bowl mix together bananas, sugar, eggs and melted butter. Stir the banana mixture into the flour mixture until moistened. Don’t over mix. Spoon the batter into the prepared muffin cups.

For the topping, mix together the brown sugar, flour, cinnamon and butter in a small bowl. Cut in butter until the mixture resembles coarse cornmeal. Sprinkle the topping over the muffin batter. Bake for 18 to 20 minutes or until a toothpick inserted into the center of a muffin comes out clean.

Makes 20 muffins

LinkWithin

Related Posts with Thumbnails