Saturday, December 31, 2011

Happy New Year!


I can’t believe we are saying goodbye to 2011 today!  We will enjoy a smaller New Year’s Eve this year than we did last year.  Suzanne, Kevin and their son will be joining us for Mexican food (ordered in), games and movies. 


I’m in total hibernation mode, so I'm keeping everything simple.  I’m using the same table setting I used for Christmas.   After seeing a beautiful table in Southern Living with blue, silver and green, I decided to make a blue table runner for my Christmas table.  The blue fabric I found has a small bright green stem that is perfect for Christmas. 

 
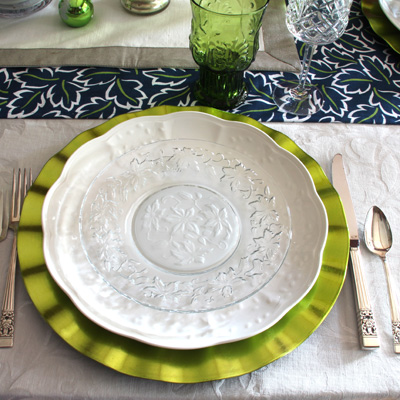
I added my green Crate and Barrel chargers and used my beautiful Lenox Butterfly Cloud dinner plates.  The Princess House Fantasia luncheon plates for salad added a sparkly touch, and I added the green glass napkin rings and my favorite green water glasses.

 
My green trees and mercury glass candleholders and votives finished the look.  I think the blue, green and white table is a winner (if I do say so myself).

I made these Onion Squares for our Christmas cocktail party.  I’ve made them a few times in the past to rave reviews.  For the cocktail party, I substituted whole-wheat pastry flour for half the all-purpose flour.  I won’t make that substitute again. The whole-wheat pastry flour made the dough a little heavy.   The dough is light and airy when using only all-purpose flour, so I didn’t change the original recipe.  The topping is delicious.  The onion and rosemary cook down to an almost jam like consistency, and pair beautifully with the blue cheese.  Caramelized Onion Squares are elegant appetizers to serve at your next cocktail party.


Caramelized Onion Squares with Blue Cheese
Adapted from epicurious.com
Crust
2 cups all-purpose flour
2 teaspoons baking powder
¾ teaspoon salt
¾ cup whole milk
¼ cup olive oil
2 tablespoons unsalted butter, melted

Topping
2 tablespoons unsalted butter
2 tablespoons olive oil
3 large yellow onions, halved and thinly sliced
1 tablespoon finely chopped fresh rosemary
1 teaspoon sugar
½ teaspoon salt

1 cup crumbled blue cheese

Crust
Preheat oven to 425°F.  Mix flour, baking powder and salt in a medium bowl and stir to blend.  Whisk milk, olive oil and melted butter in a liquid measuring cup.  Make a well in the dry ingredients and slowly pour milk mixture into the well.  Stir ingredients until just blended and smooth.  On a lightly floured surface, roll the dough into a 10x13-inch rectangle.  Transfer the dough to a rimmed baking sheet.  Re-shape the dough into a rectangle, and pierce dough all over with a fork.  Let dough rest at room temperature while preparing the topping.

Topping
Melt butter with the oil in a large Dutch oven over high heat.  Add onions and cook until the onions are soft and beginning to brown, stirring frequently, about 10 minutes.  Add rosemary, sugar, salt and a generous grinding of black pepper.  Reduce heat to medium.  Continue to cook until the onions are soft and dark brown, stirring frequently, about 20 minutes.  Cool.

Spread onion mixture evenly over dough.  Sprinkle with cheese.  Bake until crust is golden and the cheese is bubbling, about 20 minutes.  Let cool for 10 minutes and cut into squares.  Serve warm or at room temperature.

Tuesday, December 20, 2011

Almond Chocolate Thumbprints

As I mentioned yesterday, I was heading off to my fourth party of the season.  Conny has hosted a cookie exchange for several years (last year she was off in Europe, so we all missed out).  She makes cookies for the exchange, but she also serves some nice savory dishes to balance out the sweet cookies.  A couple of year’s ago, she served Crostini with Mushrooms and Prosciutto  for her cookie exchange.  She keeps all of her December magazines, so she can have party recipes at her fingertips. This year, she had the non-bakers in the group bring the appetizers, and she served Pomegranate Blood Orange Mimosas as her signature drink.  I only saw a quick glimpse of the recipe, but I think this one is close. 

I had a blast last night.  I love seeing everyone’s cookies and hearing the stories behind some of them.   What could be more fun than sipping mimosas, munching cookies and chatting with friends?  If you figure it out let me know. 

My contribution to this year’s cookie exchange was Almond Chocolate Thumbprints.  I found this recipe in The Best of Fine Cooking Cookies magazine.  Thanks to Conny, I now keep all my holiday magazines, and I’ve enjoy flipping through them deciding what I’m going to make.   This is the first year the Almond Chocolate Thumbprints called to me.  I’m glad I finally made them.  I love the sandy texture of these cookies, and the chocolate filling is rich and delicious in these tempting cookies.  The recipe is one of those 3 in 1 cookie dough recipes, so I made a little extra of the Almond Cookie dough to try one of the other recipes.  I’m hoping the Almond Sables will be equally as good.


Almond Cookie Chocolate Thumbprints
Adapted from Fine Cooking
½ cup granulated sugar
½ teaspoon salt
¾ cup whole almonds
1 ½ cups unsalted butter (3 sticks), cut in large chunks and slightly softened
4 teaspoons vanilla extract
¼ teaspoon pure almond extract
3 cups all-purpose flour
¾ cups turbinado (raw) sugar
8 ounces semi-sweet chocolate, coarsely chopped
3 tablespoons unsalted butter

In the bowl of a food processor, process the sugar and salt until it looks powdery and fine, 30 to 60 seconds.  Add the almonds, and process until they are finely chopped, 20 to 30 seconds.  Add the butter, vanilla and almond extract.  Pulse until the butter is fully incorporated and smooth, scrapping the sides of the bowl, if necessary.  Add half the flour and process until incorporated, and then add the second half of the flour and process until a soft dough forms. 

Using a small scoop to measure the dough, roll the dough into one-inch balls.  Roll the balls into the turbinado sugar and place on a baking sheet lined with parchment paper.  Press your thumb into each ball, dipping your thumb in flour as needed.  Cover and refrigerate at least 2 hours or preferably overnight.

Remove the cookies from the refrigerator, and arrange them 1 inch apart on a parchment lined cookie sheet.  Preheat the oven to 325°F.  Let the cookies sit at room temperature while the oven preheats.  Bake the cookies for 10 minutes.  Gently press the center of the cookies with the tip of the handle of a wooden spoon to redefine the depression. Rotate the cookie sheet and continue to bake until the tops of the cookies are lightly colored and the bottoms are golden brown, another 8 to 10 minutes.  Transfer the cookies to a wire cooling rack and let cool completely. 

Make the filling while the cookies cool.  Add the chocolate and butter to a heatproof bowl set over a saucepan with barely simmering water.  Stir until the chocolate is almost melted.  Remove from heat and continue stirring until the mixture has completely melted and is smooth.  Spoon the filling into the depression of each cookie.  Makes about 5 dozen cookies.

Monday, December 19, 2011

Italian Chocolate Spice Cookies

The hall is decked, the cookies are baked and the candy has set—it’s time to entertain and be entertained!  I’m in the middle of a delightfully busy time.  I attended a couple of women only parties.  One of the girl parties was an ornament exchange, which I look forward to each year.  The other party was new to me this year, but it was lovely.  And, tonight I’m going to a cookie exchange.  In between the ornament and cookie exchanges, Les and I threw open the doors of our house, and had a cocktail party Saturday night.  We worked hard all day to get ready for our cocktail party, but all the hard work paid off.  Les and I had a great time at our own party.  I love when that happens!  We have a really fun group of friends who enjoy a good party, and as every hostess knows, the guests make the party.


I invited everyone to bring a dish to share, so we had some wonderfully delicious food.  I served cranberry salsa, sweet spicy nuts, caramelized onion squares (I’ll share the recipe later), double-decker fudge, brown sugar spice cookies and Italian chocolate spice cookies.  The Italian chocolate spice cookie recipe was given to me by a friend years ago (Hi Vicky!).  Les likes these cookies with a cup of coffee (sometimes for breakfast).


I have to tell you, though the Italian chocolate spice cookies were delicious, they were overshadowed a bit by the fudge, a beautiful apple pie, and a spectacular croquembouche. I had no idea Sandy and Brian were toiling over such a stunning dessert.  I should have known something was up when they were late, but I couldn’t believe my eyes when Brian paraded the croquembouche through the kitchen to the dining room where he placed it with the other desserts. (I did steal it away for a few minutes, so I could snap a few pictures.)  Sandy and Brian are fearless in the kitchen.  They have made most of the cover desserts from Fine Cooking’s holiday issues, and lucky me, I’ve even gotten to taste a few!  
 

If you are looking for a show-stopping desert, check out Fine Cooking’s croquembouche, but if you are looking for an unassuming but tasty chocolate spice cookie to share or enjoy with coffee, try these Italian Chocolate Spice Cookies.  Vicky and her mom used to make dozens of these spicy sweet cookies to share, so the original recipe made 10 dozen.  I cut the original recipe in half, but you can easily double it—just use a big bowl. 
 

Italian Chocolate Spice Cookies    
Printable Recipe
2 ½ cups all-purpose flour
¾ cup granulated sugar
2 ½ teaspoons baking powder
¼ cup cocoa powder
1¼ teaspoons cloves
1½ teaspoons freshly grated nutmeg
1½ teaspoons allspice
1½ teaspoons cinnamon
1 cup chopped walnuts, toasted
½ cup raisins
1 package chocolate chips
2 eggs beaten
1½ teaspoons vanilla
½ cup melted Crisco
½ cup milk

1 cup powdered sugar, sifted
1 tablespoon milk (may need more)

Preheat the oven to 350°F. Put all dry ingredients into a large bowl, including nuts, raisins and chocolate chips. Mix until well blended. Make a well in the flour mixture and add eggs, vanilla, Crisco and milk. Mix the ingredients (works best if you use your hands). The dough will be sticky. Using a small scoop to measure the dough and roll into little balls and place on a baking sheet lined with parchment paper. Bake for 10 minutes. Cookies will be a little soft when they first come out of the oven. They will get a little firmer when cool.

Mix powered sugar and milk to make a thick glaze. Dip the top of the cookies in the glaze and let dry. Makes about 5 dozen cookies.

Sunday, December 11, 2011

Chocolate Butterscotch Double-Decker Fudge


It must be close to Christmas since I’ve made my grandma’s double-decker fudge.  My dad insists my grandma made this fudge by mistake when she didn’t have enough chocolate to make a full batch of fudge.  I have my doubts.  My grandma didn’t have a reputation as a good cook, so I think the things she did well are even suspect.  No matter how she came up with her double-decker fudge, I loved it as a kid, and it always makes me think of Christmas.  I try to make it every year.  This year I’m going to package it up and give it away as teacher and hostess gifts.

I made two batches this year.  My family, though secretly delighted, thought I was crazy making so much fudge.  How soon they forgot last year’s debacle! 

Christmas time last year, I had plans to give fudge as teacher and hostess gifts too.  I made one batch of double-decker fudge.  I scored it, covered it tightly and left it on the counter while I went to work.  When the kids and I got home, we noticed the foil I left covering the fudge was now suspiciously on the floor.  The glass dish was still on the counter, so I thought we had dodged a catastrophe.  But, on closer examination, I saw a dog’s tongue-width groove etched in the butterscotch layer.   The whole batch had to go into the trash!  Thank you, Chipper!


I’m afraid I’m scarred by the whole incident, so I went a little overboard this year, and made two batches of fudge.  I have also placed a dog-proof barricade in front of the fudge, so we don’t have a repeat of last year. 

Chocolate Butterscotch Double-Decker Fudge
Adapted from the original Fantasy Fudge recipe.
Chocolate Fudge Layer
3 cups sugar
1½ sticks of unsalted butter
2/3 cup of evaporated milk
12 ounces of semi-sweet chocolate chips
7 ounce jar marshmallow cream
1 teaspoon vanilla

Butterscotch Fudge Layer
3 cups sugar
1½ stick of unsalted butter
2/3 cup of evaporated milk
12 ounces of butterscotch chips
7 ounce jar marshmallow cream
1 teaspoon vanilla

Line a 13x9 inch baking pan with aluminum and spray with cooking spray, set aside.

Add the butter, milk and sugar to a heavy 2 ½ quart sauce pan, and bring to a boil stirring constantly.  Once the mixture reaches a roiling boil, boil on medium heat for 4 minutes still stirring constantly, so the mixture doesn’t scorch.  Take the mixture off the heat and stir in the chocolate chips.  Once the chips have melted, add the marshmallow cream and the vanilla, and stir until completely combined.  Pour into the prepared pan.

Repeat with the butterscotch chips (using a clean sauce pan).  Pour the butterscotch mixture directly over the chocolate layer. 

When the mixture has set slightly, score the top into one-inch increments.  Once the fudge has completely set, cut using the score marks.  Store in an airtight container.

Sunday, December 4, 2011

Chewy Cranberry Oatmeal Cookies


My daughter had her wisdom teeth removed Friday.  She is recovering nicely, thank you, though the soft diet is getting her down a bit.  I stayed home from work Friday to administer medication, fluff pillows, and run out for milkshakes (to be eaten with a spoon, of course), but since my daughter slept most of the day, I had time on my hands.  What did I do with all that time?  I baked Christmas cookies! 

I mentioned in my Thanksgiving post that my mom didn’t like the holidays, but she did like to bake cookies, or maybe she just liked to eat the cookies.  Either way, I do have good memories of baking Christmas cookies with my mom.  She had some tried and true recipes, but she always let me look though her cookbooks for new cookies to try.  We had some winners and some losers, but I always had fun. 

I have a collection of Christmas cookies I like to bake now, but as in years past, I always look through books and magazines for new cookies to try.  I save the Christmas cookie magazines I buy, so I have a few years worth of magazines to inspire me.  Each year, I’m drawn to different cookies. 

As I’m moving my family toward a healthier diet, I decided to see what King Arthur Flour’s Whole Grain Baking cookbook has to offer.  There are some intriguing whole grain recipes in the book, but I’m a sucker for oatmeal cookies, so I chose their chewy oatmeal cookies to try.  I added my own take on the cookies, and they are going to be delicious in my Christmas cookie line-up.  Are they healthy?  Probably not with a stick and a half of butter, but I do like the whole grains in the cookies.  Chewy Cranberry Oatmeal cookies are a sweet, tart and spicy combination that I’m glad I tried this year.

Chewy Cranberry Oatmeal Cookies
Adapted from Whole Grain Baking from King Arthur Flour
¾ cup unsalted butter (1½ sticks)
1 ¼ cup dark brown sugar, tightly packed
3 tablespoons dark corn syrup
¾ teaspoon baking soda
½ teaspoon baking powder
½ teaspoon cinnamon
¼ teaspoon ginger
¼ teaspoon freshly grated nutmeg
1 tablespoon cider vinegar
1 tablespoon vanilla extract
1 large egg
1 1/3 cups old-fashioned rolled oats
1 ¼ cups whole-wheat pastry flour
2 cups dried cranberries
1 cup chopped walnuts, toasted

Preheat oven to 350°F, and line two baking sheets with parchment paper.

In the bowl of a stand mixer add the butter, sugar, corn syrup, baking soda, baking powder, salt cinnamon, ginger, nutmeg, vinegar and vanilla, and beat with the paddle beater until creamy.  Beat in the egg.  Add the oats, flour, cranberries and nuts and stir to combine.  Using a small ice cream scoop, drop the dough onto the prepared baking sheets.  Bake cookies until they begin to brown around the edges, but are still soft in the center, about 12 minutes, rotating the baking sheets about halfway through.  Remove the cookies from the oven and let rest on the cookie sheet for 5 minutes, and then transfer the cookies to a rack to cool.  Makes 4 to 5 dozen cookies. 

LinkWithin

Related Posts with Thumbnails