When I saw the recipe for “Perfect” Chocolate Chip Cookies in Cook’s Illustrated, my first thought was, “Really? Isn’t it a little arrogant to say your cookie recipe is perfect?” My second thought was “I’ll be the judge of that. Bring it on!”
Like most of us, I was brought up on Toll House cookies, and I was satisfied with them, that is, until a couple of years ago. I blame my recent dissatisfaction on an experiment I embarked on. I had decided to see if I could make myself like dark chocolate. I had read somewhere that if you give a picky child a food he or she doesn’t like often enough, the child would eventually grow to like it. It was worth a try. I had always loved milk chocolate. Dark chocolate, on the other hand, always tasted bitter and harsh to me. I wanted to like dark chocolate, so I ate a piece of dark chocolate every day for a week or two (I know, a difficult job!). And, do you know what? At the end of the experiment, I loved dark chocolate. I the harsh bitterness was gone, replaced by a delicious complexity that I couldn’t get enough of. I no longer enjoyed Toll House cookies as a result of my experiment, though. The chocolate chips tasted too sweet, and the dough was too cakey.
That being said, I decided to take up CI’s unwritten challenge of the “perfect” cookie. The magazine recommends Ghirardelli 60% cacao chocolate chips, so I pick up a bag along with some dark brown sugar (the only two ingredients I needed) at the grocery store.
The technique for making these cookies is very different—No creaming the butter and sugar in this recipe. No, you melt and brown the butter before you mix in the sugar. I do have to say, the browned butter gives the cookies an amazing toffee and caramel flavor. Don’t skip the step of browning the butter, as it is important to the flavor of the cookie.
Is this a “perfect” cookie? I don’t know. I do know it is a really good cookie I will make again. I also know the cookie has the chewy texture and the complex flavor I have been looking for, and the dark chocolate chips work beautifully in this cookie.
“Perfect” Chocolate Chip Cookies
From Cook’s Illustrated
1¾ cups of unbleached all-purpose flour
½ teaspoon baking soda
14 tablespoons unsalted butter
½ cup granulated sugar
¾ cup packed dark brown sugar
1 teaspoon table salt
2 teaspoon vanilla extract
1 large egg
1 large egg yolk
1 ¼ cup semisweet or bittersweet chocolate chips or chunks
¾ cups chopped pecans or walnuts, toasted
Preheat the oven to 375°F and line 2 large baking sheets with parchment paper.
Whisk together the flour and baking soda together in a medium bowl and set aside.
Heat 10 tablespoons of butter in a 10-inch skillet (do not use a non-stick pan because you will not be able to gauge how brown the butter is on the dark surface). Cook the butter over medium heat until it is melted, about 2 minutes. Continue cooking, swirling the pan constantly, until the butter is golden brown and nutty, about 1 to 3 minutes. Spoon the butter into a heatproof bowl. Add the remaining butter, and stir to melt. Once the butter has melted, stir in the tow sugars, salt and vanilla and whisk to combine. Add the egg and the egg yolk and whisk until no sugar lumps appear.
These next instructions are unique, but the magazine insists they are important to the texture and taste of the cookie. Whisk the sugar mixture for 30 seconds then put down the whisk and leave the mixture for 2 minutes. After 2 minutes, whisk again, and repeat the interval twice more. The mixture should be smooth, shiny and thick. Stir the flour mixture into the sugar mixture just until combined. Add the chocolate chips and pecans and stir to combine.
Spoon the cookie dough onto the prepared baking sheets leaving 2 inches between the cookies using about 3 Tablespoons of dough per cookie (I used a cookie scoop to keep the cookies even). Bake the cookies for about 10 to 14 minutes, or until the middle of the cookies are still soft, but the edges have begun to set. The magazine recommends baking the cookies one tray at a time. Don’t tell anyone, but I have a convection oven, so I baked the cookies all at once. They were probably not as evenly baked as they could have been, but I was pressed for time. Take the cookies sheets out of the oven and cool on a wire rack. Cool the cookies completely before serving (another CI instruction, but who are they kidding? As if anyone could wait). Makes about 16 cookies.
Wednesday, April 29, 2009
Monday, April 27, 2009
Tomato Tart
Lynn’s sister and brother-in-law were in town for a visit. Les and I wanted to see Debbie and Stan before they went back to Connecticut, so we joined them for dinner at Lynn and Dad’s. We had a lovely visit, and a delicious dinner. Our evening started with Debbie’s tomato tart. Debbie doesn’t remember where she found this recipe—I’m just glad she decided to make if for us.
The tart was easy to make using puff pastry as the base and some simple ingredients. You don’t have to be a baker to make this tart—you just have to find the puff pastry in the freezer section. The simple ingredients work well together. Just be sure to season the tomatoes with enough salt and pepper to bring out all the flavors.
Tomato Tart
1 sheet puff pastry
2 tomatoes, sliced and dried between paper towels
1½ cups of shredded Fontina cheese
1 to 2 teaspoons chopped thyme (you can also use basil)
Kosher salt and freshly ground pepper
1 egg
1 tablespoon water
Preheat the oven to 400°F. Roll the puff pastry out to about 9X13 inch rectangle. Slice about 1 inch of dough from each side. Place the large section of dough on parchment paper on a baking sheet, and put the small strips of dough on the edges of the large section dough to make a crust. Dock the base of the tart by picking the dough with a fork being careful not to prick the crust. Mix the egg and water, and brush the egg mixture on the edges of the tart.
Bake the tart dough for about 15 minutes or until the crust has puffed and is lightly golden. Remove the partially baked tart dough from the oven, and top with the cheese, tomatoes, salt and pepper, and thyme. Place the tart back into the oven for about 20 minutes or until golden brown and crisp on the bottom. Slice and serve.
Thursday, April 23, 2009
Rigatoni with Sausage, Peppers and Onions
Are you looking for a quick and healthy weeknight meal? I have a pasta dish you might enjoy. Rigatoni with Sausage, Peppers and Onions is a delicious and quick pasta dish you can whip up after a long day. I am always on the hunt for new recipes for weeknight meals. I found this recipe in Everyday Pasta by Giada De Laurentiis, and my family likes this pasta. The kids pick out the peppers, but that’s okay—more for me!
I’ve made a few of Giada’s recipes, and I have yet to be disappointed. In this recipe, onions and peppers are sautéed with Italian sausage and mixed with tomatoes and Marsala to make a hearty pasta sauce. I usually toss a salad to serve on the side.
Rigatoni with Sausage, Peppers and Onions
Adapted from Everyday Pasta by Giada De Laurentiis
¼ cup extra virgin olive oil
1 pound sweet Italian turkey sausages
2 red bell peppers, cored, seeded and sliced
2 yellow onions, sliced
1 teaspoon salt
1 teaspoon freshly ground pepper
4 cloves garlic, chopped
½ teaspoon dried oregano
½ cup chopped fresh parsley
2 Tablespoons tomato paste
1 cup Marsala wine
1 (14.5-ounce) can diced tomatoes, with juice
¼ teaspoon crushed red pepper flakes (optional)
1 pound rigatoni pasta
Freshly grated Parmesan cheese, for garnish
Heat the olive oil in a large skillet. Add the sausage and cook until browned on all sides about 7 to 10 minutes. Remove the sausage from the pan, and set the sausage aside. Keep the pan on the heat, and add the peppers, onions, salt and pepper, and sauté until the onions are soft and golden, about 5 minutes. Add the garlic, oregano and parsley and cook for another couple of minutes. Then add the tomato paste and stir to combine. Pour the Marsala and tomatoes into the pan scraping up the browned bits on the bottom, and add the crushed red pepper flakes if you are going to use them. Bring the sauce to a simmer. Cut the sausage into 1-inch pieces and add to the sauce. Simmer the sauce until thickened, about 20 minutes.
While the sauce is simmering, bring a large pot of water to a boil, and add the pasta. Cook the pasta according to the package directions. Once the pasta is tender but still firm to the bite, drain the pasta and stir it into the sauce. Sprinkle with the Parmesan cheese and serve. Makes about 4 to 6 servings.
Wednesday, April 22, 2009
White Panini with Arugula
The weather here has been hot for the last few days. We have had four days of 90° plus temperatures, so it seems like we went straight from winter to summer skipping spring entirely. I’m not complaining, but with these temperatures, I haven’t felt like eating, much less cooking. Luckily, I’ve had leftovers to feed my family, but the weather got me thinking about the hot days of summer. I love summer and all the grilling that comes with it, but with all the fun summer activities, sometimes you need to put something on the table quickly. I have a delicious sandwich that can be on the table in minutes.
White Panini with Arugula is a riff on Ina Garden’s White Pizza with Arugula, but the sandwich is easier. I love the mixture of cheeses with the crisp arugula in the middle. If you are interested in more sandwich recipes, Pithy and Cleaver has devoted a whole month to grilled sandwiches.
White Panini with Arugula
1 Loaf Ciabatta bread, sliced into 12 slices
1/2 cup olive oil
2 cloves of garlic smashed
5 sprigs of fresh thyme
6 slices Fontina cheese
6 slices of mozzarella cheese
6 ounces Feta cheese
8 ounces baby arugula
¼ cup good olive oil
2 tablespoons freshly squeezed lemon juice
Place the ½ cup of olive oil in a small saucepan, and add the garlic, thyme and bring to a simmer and let steep for 10 minutes. Make sure the garlic doesn’t burn. Let cool slightly.
Brush prepared oil on one side of each slice of Ciabatta bread. Place the Fontina on 6 slices of bread, and place the mozzarella and Feta on the other 6 slices. Place the bread oil side down on a Panini press, and set the lid of the press above the cheese, but not touching the cheese. You can also place the bread in the broiler to melt the cheese.
Meanwhile, whisk together the ¼ cup of olive oil, lemon juice, salt and pepper to taste. Toss the arugula with the dressing and set aside.
Once the cheese is melted and browned, remove the bread from the Panini press or oven. Place the arugula on the slice bread with the Mozzarella and Feta cheese, and place the slice of bread with the Fontina on top of the arugula. Makes 6 sandwiches.
Sunday, April 19, 2009
Crock-Pot Lasagna
Wow, I’m pooped! I don’t know how a 2-hour Get Smart birthday party for a nine-year-old could be so tiring, but I am wiped out. The boys decoded messages, climbed though “lasers,” shot Nerf darts at targets and each other, went on a mission to free some Junior Mints, sang “Happy Birthday,” and ate cake. We had a full two-hours, and the boys had fun (at least I hope so).
After a full day, I was glad to have lasagna in the crock-pot for dinner. Yes, I did say “lasagna in the crock-pot.” This is one of my favorite crock-pot recipes, but when I first found the recipe, I didn’t believe you could cook lasagna in a crock-pot. I imagined a wet mass of noodles and sauce, but I tried the recipe anyway. I’m glad I did, because instead of a wet mass, I had beautifully cooked lasagna I could prepare in the morning and forget about until dinner.
I adapted this Crock-Pot Lasagna from a recipe I found on allrecipes.com. I think of this recipe as a technique rather than a true recipe. This lasagna would be delicious with Italian sausage or ricotta cheese, but I don’t change the recipe because, frankly, my kids like it this way and will eat it. If you do change the recipe, just make sure you have enough liquid in the sauce. The noodles tend to turn gummy if you do not add enough liquid.
Crock-Pot Lasagna
Adapted from allrecipes.com
1 pound ground beef
1 onion, chopped
2 cloves garlic, minced
43.5 ounces of tomato sauce (29 ounce can and 14.5 ounce can)
1 6 ounce can tomato paste
1 teaspoon salt
1 teaspoon oregano
1 pound package lasagna noodles
12 ounces cottage cheese
½ cup grated Parmesan cheese
16 ounces shredded mozzarella cheese
In a large skillet, cook beef, onion and garlic until meat is browned and onion is tender. Add the tomato paste, tomato sauce, salt and oregano. Cook until heated through. In a large bowl, stir together the mozzarella, cottage cheese, and Parmesan cheese.
In a 5-quart crock-pot, spoon a layer sauce on the bottom. Add a double layer of uncooked noodles (break the noodles to fit into the crock-pot), and top the noodles with cheese mixture. Repeat the layers of sauce, noodles and cheese until all ingredients are used. I end with sauce.
Cook on low for 6 to 8 hours. Serves 10.
Friday, April 17, 2009
Strawberry-Orange Muffins
I’m in the middle of planning my almost nine-year-old son’s Get Smart birthday party, so I'm going to leave you with these strawberry muffins for the weekend. I know I’ve been on a strawberry kick recently, but the strawberries taste so good and are so beautiful I can’t seem to help myself. Maybe things will change when more fruits are in season, but I can’t guarantee anything.
These muffins are really good. Their strawberry-orange fragrance hits you before you even bite into one. The crumb is delicate and the muffins are moist from the strawberries, and I was able to use my homemade jam to top the muffins.
Strawberry-Orange Muffins
From Williams-Sonoma’s Muffins & Quick Breads
2 ¼ cups all-purpose flour
2 teaspoons baking powder
1 teaspoon baking soda
½ teaspoon salt
¾ cup sugar
½ cup of milk
½ cup sour cream
1/3 cup vegetable oil
1 egg
1 Tablespoon finely grated orange zest
1 cup of thinly sliced strawberries (Place the slices between two paper towels to dry, so the strawberry juice doesn’t stain the batter.)
1/3 cup strawberry jam
Preheat oven to 400°F. Butter standard muffin tin. In a large bowl, stir together the flour, baking powder, baking soda and salt, and set aside. In a medium bowl, whisk together the sugar, milk, sour cream, oil, egg and orange zest. Stir in the strawberry slices. Add the wet ingredients and stir just until blended. Spoon the batter into the prepared muffin tin, and top with a scant teaspoon of strawberry jam. Bake until a toothpick inserted in the center of a muffin comes out clean, about 15-18 minutes. Cool the muffins in the tin for 5 minutes and then remove. Makes about 12 muffins.
Wednesday, April 15, 2009
Easter Dinner
We had a lovely if quiet Easter Sunday. My dad and Lynn joined us, but Les had to work, so I kept our meal simple. Until a few years ago, I always ordered spiral sliced hams for Easter and usually Christmas too. It was easy for holiday meals, and with two small kids, I always looked for easy. Then one Easter, I forgot to order the ham, so I picked up one from the grocery store. I thought I had grabbed a spiral ham, but when I opened it on Easter, I realized it was an unsliced ham—a ham I needed to cook for a couple of hours, and a ham that didn’t come with glaze. I had to improvise. I didn’t want to go to the store on Easter, so I had use what I had on hand. I found a glaze recipe that called for brown sugar, mustard, cider vinegar and whole cloves. I had everything except the whole cloves, but I did have ground cloves. I mixed the ingredients and baked the ham, and I never bought a spiral sliced ham again. The ham was moist, juicy and more flavorful than any spiral sliced ham I have ever had (and it cost less too).
Mustard Glazed Bone-In Ham
1 bone-in ham
1 cup of brown sugar
¼ cup prepared mustard
2 Tablespoons of cider vinegar
Whole cloves
Preheat the oven to 400°F. Score the ham in a diagonal pattern, and place the cloves in the center of the diamonds. Place the ham in a roasting pattern and into the oven. Bake the ham for 10-15 minutes per pound. Take the ham out of the oven 30 minutes before it has finished roasting, and spoon the glaze over it. Place the oven back into the oven until it has finished.
I served the ham with potato casserole and roasted asparagus. The meal was so simple, I didn’t even get a picture. I did get pictures of our appetizer and dessert. For the appetizer, I made Smitten Kitchen’s artichoke-olive crostini. My son liked the crostini because he could taste the olives (he loves olives), and my daughter liked the mixture of flavors. I enjoyed the tangy flavors of the olives and capers.
Lynn was going to pick up something for dessert, but my daughter decided she wanted to make something instead. She adapted the Fresh Raspberry Cream Cakes from the Cupcake Doctor Cookbook. My daughter found a winner recipe with these cream cakes. She used strawberries instead of raspberries since we had plenty of strawberries. The cakes are smooth and creamy with a tart sauce and a delicious graham cracker crust. This dessert tastes like spring.
Fresh Strawberry Cream Cakes
Adapted from Cupcake Doctor Cookbook by Anne Byrn
12 foil liners for cupcake pans
¾ cup graham cracker crumbs
¼ cup finely chopped pecans
3 Tablespoons butter, melted
2 cups fresh strawberries washed and drained
8 ounces reduced-fat cream cheese at room temperature
1 can (14 ounces) sweetened condensed milk
1 container (8 ounces) frozen whipped topping, thawed
Line 12 cupcake cups with the foil liners and set aside. Put the graham cracker crumbs, melted butter and chopped pecans in a mixing bowl and stir to combine. Spoon about 1 tablespoon of the graham cracker crumbs into each foil liner pressing down with your fingers to create a crust.
Reserve 12 strawberries for garnish, and place the remaining strawberries in a food processor and pulse until pureed about 10 seconds. Measure out ½ cup of the puree for the filling and set aside. Place the remaining puree in a fine mesh sieve over a small glass bowl to catch the juices. Press the puree gently to extract as much juice as possible. Cover the juice and refrigerate until needed.
Put the cream cheese in a large mixing bowl, and beat with an electric mixer until creamy about 30 seconds. Add the sweetened condensed milk and reserved ½ cup of pureed strawberries. Blend just until combined about 20 to 30 seconds. Add 1 cup of the whipped topping and blend on low speed to combine about 15 seconds.
Top the crusts with the strawberry mixture, dividing it evenly. The liners will be very full but not overflowing. Cover the pan with plastic wrap and freeze for at least 3 hours.
Remove the pan from the freezer 15 minutes before you serve them. To serve them peel away the foil liners from the cakes and place the cakes on a serving plates. Top with whipped topping, drizzle with the reserved juice and garnish with a reserved strawberry. My daughter used Cool Whip, but you could use fresh whipped cream instead.
Tuesday, April 14, 2009
Strawberry Jam
I did something Saturday I truly enjoyed but have never done before. I made jam! My friend and coworker brought me a half a flat of strawberries earlier in the week from a farm stand near her home. My family enjoyed the fresh strawberries, but we were not eating them fast enough, and I didn't want them to go to waste. So, I stopped at a local hardware store for some canning supplies and Ball’s Blue Book of Preserving. I flipped through the book, and noticed the strawberry jam, but I also noticed the recipe for strawberry rhubarb jam. You know how much I like strawberries and rhubarb, so I picked up some rhubarb at the grocery store too.
Saturday afternoon, after my son’s baseball game, I got started making jam. I don’t really know why, but I loved the process. All of the pots of water on the stove keeping the lids and glass jars hot, and the pot of fruit bubbling away. I was in heaven. I ended the day with 6 half-pints of strawberry rhubarb jam, and 8 half-pints of strawberry jam. I have already given some away, and I am looking forward to making my next batch of jam. My Grandma Nellie made a delicious plum butter I would like to recreate, so I may have my next project.
Strawberry Rhubarb Jam
From Ball’s Blue Book of Preserving
2 cups of crushed strawberries
2 cups of chopped rhubarb (about 4 stalks)
1 package powdered pectin
¼ cup lemon juice
5 ½ cups sugar
Combine strawberries, rhubarb, pectin and lemon juice in a large saucepan. Bring the fruit mixture to a boil over high heat. Add the sugar, and stir until it dissolves. Return the mixture to a boil, and boil hard for 1 minute. Remove from the heat, and skim foam if necessary. Ladle the hot jam into hot jars leaving ¼ inch space at the top of the jar. Clean the jar, and place the two-piece cap on the jar. Process 10 minutes in boiling water. Yields 6 half-pints.
Strawberry Jam
From Ball’s Blue Book of Preserving
8 cups of strawberries, crushed
1 package powdered pectin
¼ cup lemon juice
7 cups of sugar
Combine strawberries, pectin and lemon juice in a large saucepan. Bring the fruit mixture to a boil over high heat. Add the sugar, and stir until it dissolves. Return the mixture to a boil, and boil hard for 1 minute. Remove from the heat, and skim foam if necessary. Ladle the hot jam into hot jars leaving ¼ inch space at the top of the jar. Clean the jar, and place the two-piece cap on the jar. Process 10 minutes in boiling water. Yields 8 half-pints.
Yogurt Biscuits
From How to Cook Everything by Mark Bittman
2 cups of all-purpose flour
1 scant teaspoon of salt
3 teaspoons of baking powder
1 teaspoon baking soda
2 to 5 Tablespoons of cold butter (I used 4 Tablespoons)
¾ cup plus 2 Tablespoons of yogurt
Preheat the over to 450°F. Mix the dry ingredients in the bowl of a food processor. Add the butter, and pulse until combined. Make sure the butter is thoroughly blended into the flour mixture. Add the yogurt and pulse until the mixture forms a ball. Turn the dough out onto a lightly floured surface and knead it 10 times. Press the dough into a ¾-inch rectangle, and use a glass or a 2-inch round cutter to cut rounds out of the dough. Put the rounds on an ungreased baking sheet, and bake 7 to 9 minutes or until the biscuits a golden brown. Serve within 15 minutes. Makes 10 biscuits.
Thursday, April 9, 2009
Warm Potato Salad with Arugula
Are you looking for a side dish for Easter? You should make Warm Potato Salad with Arugula. I was flipping through Food & Wine last July when I saw Chef Paul Virant’s 4th of July menu, and I couldn’t wait to try the recipes. I made the chicken with pimenton, the green bean and tomato salad, and this warm potato salad. The other recipes from the menu are good, but this potato salad is fantastic! The ingredients are simple. It's the combination of flavors that shine. Arugula is my new favorite leafy green with its delicious complexity, and when you add the roasted potatoes, onions and mustard, you have a winner of a potato salad. I have served this salad with chicken, boneless pork ribs and grilled steaks. It tastes great with everything. Last week when I told Beth and Sandy I was making this, they simultaneously asked me if I was going to put it on my blog. Warm Potato Salad with Arugula is that good.
Warm Potato Salad with Arugula
From Paul Virant’s recipe in Food & Wine
3 pounds of white potatoes, scrubbed
¼ cup plus 3 tablespoons extra-virgin olive oil
Salt and freshly ground pepper
2 Tablespoons grainy mustard (I use Maille Grainy Dijon Mustard)
1 ½ Tablespoons sherry vinegar
1 small sweet onion, thinly sliced
5 ounces baby arugula (6 cups)
Preheat the oven to 425°F. Cut the potatoes into ½-inch wedges. Toss the potatoes with 3 tablespoons of olive oil and spread on 2 rimmed baking sheets. Season with salt and pepper and roast for about 25 minutes or until browned and crisp. In a small bowl, whisk the remaining ¼ cup of olive oil with the mustard and vinegar and season with salt and pepper. Once the potatoes are done, toss the potatoes with onion and arugula and top with the dressing. Toss the salad again and serve immediately. 12 servings.
Sunday, April 5, 2009
Tyler Florence's Store
I promised I would tell you about my visit to Tyler Florence’s shop last Sunday, so I am fulfilling my promise. The store was nicely laid out with a comfortable (as long as you don’t mind a tusked boar looming over you) reading room, and a wall full of Dean & DeLuca spices. There are vintage kitchen supplies in front of a small-scale kitchen where I can only imagine Tyler (or someone else) demonstrating the newest cooking techniques. There were plenty of kitchen gadgets and tools. I enjoyed my visit, but I doubt I will make the trip again, since I can find most of the supplies and tools I need at Williams-Sonoma or Sur La Table. If I could be assured of meeting Tyler, well, that would be different (maybe).
I did buy a copy of Tyler’s Ultimate, because, don’t tell anyone, but I didn’t own a Tyler Florence cookbook, and I never even made any of his recipes on the Food Network website. I can now say I have made one of his recipes—Chocolate Banana Bread. This recipe is delicious, but I think calling it a bread is a little deceiving. Chocolate Banana Bread is more like a cake than a bread. It is moist, rich and chocolaty. It reminded me of a Banana Royal (you know, bananas, ice cream and hot fudge) without the ice cream. I will be making this again with any banana sacrifices in my freezer.
Chocolate Banana Bread
From Tyler's Ultimate
2 cups all-purpose flour
¾ cup granulated sugar
¼ cup cocoa powder
1 ½ teaspoons baking powder
1 teaspoon kosher salt
½ cup (1 stick) unsalted butter, softened, plus more to grease the pan
4 ounces bittersweet chocolate, melted (I used 70%)
2 large eggs
3 very ripe bananas
1 teaspoon vanilla
Preheat the over to 350°F and butter a 9 by 5-inch loaf pan. Mix together the flour, sugar, cocoa powder, baking powder and salt in a large bowl. In the bowl of a mixer, cream the butter until it is light and fluffy. Add the chocolate, eggs, bananas and the vanilla, and beat after each addition. Add the dry ingredients and mix just until combined. Pour the batter into the greased loaf pan and bake until a toothpick comes out clean about 50 to 60 minutes. Transfer to a cooling rack and wait 15 minutes before you take the bread out of the pan.
Wednesday, April 1, 2009
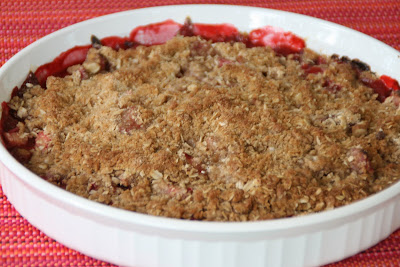
Strawberry Rhubarb Crisp
I felt very nostalgic while I was making this Strawberry Rhubarb Crisp. My Grandma Helen used to make a strawberry rhubarb pie, and I would gobble it up. She taught me how to make the pie, but somehow, my pie never tasted as good as hers. While I was baking on Saturday, I was reminiscing about the delicious southern food she used to prepare. I vaguely remember the cornbread she cooked in her cast iron skillet, and her fried okra. But, by the time I was old enough to have full memories of her cooking, my grandfather had had a heart attack and triple bypass surgery, so she had to change her cooking methods. Her food was still delicious, even with the changes.
I took Les to meet my grandparents before we were married. We joined them for lunch in their tiny apartment. Grandma served us oven fried chicken, a big bowl of potato salad, a green salad and zucchini in tomato sauce. I remember this lunch vividly—every taste, every bite. We put a big dent in the food she had on the table. When some of my cousins showed up to visit, Grandma pulled more chicken out of the oven, and more salad out of the refrigerator. Les was astonished to see the amount of food my grandmother had prepared for our visit (and his mother was no stingy hostess either). I wish I could say we finished off lunch with her famous strawberry rhubarb pie—for the sake of my story at least—but we had banana pudding for dessert.
My Grandma Helen has been gone for over 10 years now, and all of a sudden I had a craving for her strawberry rhubarb pie. It might have something to do with Lisa’s strawberry rhubarb parfait on A Dinner Party, but I don’t know. All I know is the strawberries looked plump and shiny in their basket at the store, the rhubarb was beautiful and red, and they reminded me of my grandma.
I have to admit, my last attempt at making grandma’s pie was about 20 years ago, and was not a complete success (think runny fruit and soggy crust). But I do like crisps, so I decided to try making a strawberry rhubarb crisp. This crisp is sweet and tart, and though it isn’t exactly like my grandma’s pie, it was close enough to transport me back.
Strawberry Rhubarb Crisp
Adapted from the Apple Crisp recipe in How to Cook Everything by Mark Bittman
4 cups strawberries, trimmed and sliced
2 cups of rhubarb, sliced
2 Tablespoons corn starch
2 Tablespoons fresh lemon juice
2/3 cup and 1 Tablespoon of brown sugar, or to taste
5 Tablespoons cold unsalted butter, cut into small pieces, plus butter for the pan
½ cup old-fashioned oats
½ cup all-purpose flour
1 teaspoon cinnamon
Dash of salt
Preheat the oven to 400°F. Mix the fruit with the cornstarch, ½ teaspoon cinnamon, 1 to 2 tablespoons of brown sugar and the lemon juice, and spread the mixture into a buttered 8-inch square or 9-inch round baking pan.
Combine all of the other ingredients, including the remaining cinnamon and brown sugar, in a food processor and pulse a few times until everything is well incorporated, but not uniform. You can also mix by hand, but soften the butter slightly first.
Sprinkle the topping over the fruit and bake until fruit is bubbling and the topping is browned about 30 to 40 minutes. You can serve hot, warm or at room temperature.
Subscribe to:
Posts (Atom)