I recently started following Weightwatchers again. I haven’t been on Weightwatchers for over ten years, but I knew I needed to do something when earlier this year during my vegan Lent, I only lost two pounds. Generally, I try not to equate weight loss with my Lenten promises, but (Come on!) I should have shed a few more pounds. I was obviously eating healthy, so I knew my problem was with portion control. And, Weightwatchers has been helping.
My only problem with Weightwatchers, or any weight loss program really, is that I don’t do well with someone else telling me what to eat and how much exercise I need. My mind plays tricks on me, and I end up cheating. Somehow I never think of it as cheating on myself, but as cheating on “the man.” I know, it doesn’t make any sense—it’s just how I am, and I have to work on that.
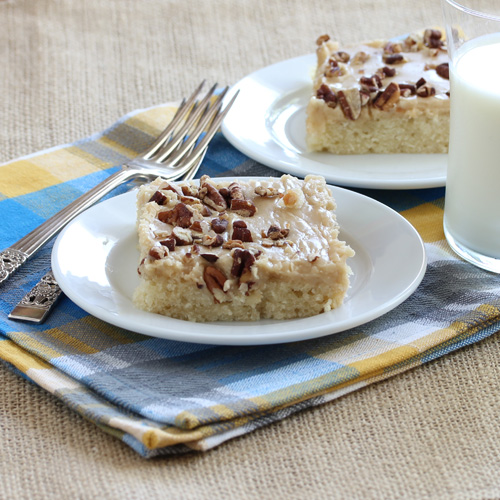
So, last week, all I could think about was cake. I’m not even a huge cake fan, but all I wanted to do was bake, and all I wanted to bake was cake. I found this recipe for Caramel-Pecan Sheet Cake in Taste of the South magazine. I’m not sure how I ended up with this magazine, but I received it in the mail, and when I saw this cake, I couldn’t resist the frosting. I’m a sucker for caramel frosting!
This cake is easy to make. I love sheet cakes for their technique. I used my hand-held mixture, but with a little fortitude, you could mix the cake and frosting by hand. And, who doesn’t love being able to pour warm frosting over a warm cake? It saves so much time, and keeps the cake tender and moist.
Les and our son loved this salty sweet cake, and were disappointed to see me packing it up to take to work. I wanted to bake a cake—I just didn’t want to eat it all! I am on Weightwatchers after all. My co-workers polished the cake off before 9:30am. Win!
Caramel-Pecan Sheet Cake
From Taste of the South
Printable Recipe
1 cup butter
1 cup water
2 cups all-purpose flour
2 cups sugar
1 teaspoon baking soda
½ teaspoon salt
¼ teaspoon ground cinnamon
¼ teaspoon ground ginger
½ cup sour cream
2 large eggs
1 teaspoon vanilla extract
Caramel Frosting (recipe follows)
1 cup chopped pecans, toasted
Preheat oven to 325°F. Grease and flour a 15x10-inch baking pan. Set aside.
In a medium saucepan, bring butter and 1 cup of water to a boil. In a large bowl stir together the flour, sugar, baking soda, salt, cinnamon and ginger. Add the hot butter mixture to the flour mixture and beat at low spread with an electric mixer just until the mixture comes together. Add the sour cream, beating well. Add the eggs one at a time and mix, and stir in the vanilla. Pour mixture into the prepared pan.
Bake the cake until it is lightly browned, and a wooden toothpick inserted into the center of the cake, comes out clean, about 25 to 30 minutes. Let cool on a wire rack for 20 minutes.
Pour hot Caramel Frosting over warm cake, spreading to edges. Sprinkle with pecans. Let the cake cool completely on a wire rack.
Carmel Frosting
½ cup butter
1 cup firmly packed light brown sugar
½ teaspoon salt
½ cup sour cream
2 ½ cups powdered sugar
½ teaspoon vanilla
In a large heavy saucepan, bring butter, brown sugar and salt to a boil over medium heat, stirring constantly. Remove from heat, and slowly stir in the sour cream.
Bring mixture just to a boil over medium heat, stirring constantly. Remove from heat.
Gradually add powdered sugar and vanilla, beating at medium speed with a hand mixer until the frosting is smooth. Pour immediately over warm cake.
Showing posts with label Dessert. Show all posts
Wednesday, May 15, 2013
Tuesday, July 19, 2011
Apple Cheddar-Cheese Cake
I was pleased to host a prayer group dinner for some of my girl friends last Friday night. My friend Barb who moved to Tennessee last year is visiting and joined us too! I love hosting this group for dinner. Everyone is so appreciative and we have such a good time. Barb slid back into the group like she had never left!
Camille asked me to host this dinner months ago while she was helping Barb plan her visit, and I agreed happily. But at the beginning of the week, I was overwhelmed with all I had going on. I didn’t know how I was going to accomplish this dinner. But, as the week went on, things got easier, and it became a joy to work on the dinner! I shopped, set the table and prepared a couple of dishes Thursday night, so when Friday came, I was really excited to host my friends!
I kept the menu really simple. I served vegetables and hummus as an appetizer, and grilled salmon, quinoa, roasted asparagus and a delicious salad (I will share it with you soon) for dinner.
For dessert, I bought an apple cake at the store, and it wasn’t until the next day when I realized I should have made this rustic Apple and Cheddar-Cheese Cake from Cake Keeper Cakes. The cake is very easy, and would have been a snap to whip up the night before. My daughter made this cake for our family, and we all enjoyed it. It is not a very sweet cake, and it is definitely rustic, but it would have been the perfect ending for my prayer group dinner. Oh well! Next time.
I kept the table simple. I used my burlap table runner for the last prayer group dinner where I paired it with the black and white toile table runner. This time I used my square of red and white toile (left over from my 4th of July table) with the burlap runner.
You have seen these cute salad plates from the Valentine’s table I did. I knew they would look great for summer too!
I placed salad plates on top of the Mikasa English Countryside white plates and brown straw placemats. I used plain wine glasses and water glasses, and my mother-in-law’s pretty silver.
I saved some of the still nice white flowers from 4th of July and added some sunflowers in a white pitcher for my centerpiece and I added my new white candlesticks from Pier One to balance the centerpiece.
Apple and Cheddar-Cheese Cake
Adapted from Cake Keeper Cakes by Lauren Chattman
Printable Recipe
½ cup unbleached all-purpose flour
¼ cup whole-wheat pastry flour
½ cup yellow cornmeal
1 ½ teaspoons baking powder
¼ teaspoon salt
½ cup unsalted butter, softened
¾ cup granulated sugar
2 eggs
6 tablespoons milk
1 cup grated cheddar cheese
1 large Granny Smith apple, peeled, cored and cu into ¼-inch pieces
Preheat the oven to 350°F. Grease a 9-inch round cake pan and dust with flour. Combine the dry ingredients, flours, cornmeal, baking powder, and salt, in a medium bowl.
Cream butter and sugar in a large mixing bowl with an electric mixture for about 3 minutes, or until light and fluffy. With the mixture on medium low speed, add the eggs, one at a time, scraping down the sides of bowl after each addition.
With the mixture on low, add ½ of the flour mixture. Add the milk and then the flour mixing until just combined. Stir in the cheddar cheese and apple.
Scrap the batter into the prepared pan smoothing the top with a spatula. Bake the cake until it is golden brown and when a toothpick inserted into the center of the cake, comes out clean, about 30-35 minutes.
Let the cake cool in the pan for about 10 minutes. Invert on a wire rack and then turn it right side up on the rack to cool completely.
If you are looking for more table inspirations, please check out Between Naps on the Porch where you will find some great table settings.
Monday, July 11, 2011
Chocolate Toffee Bark
Summer has been slow to come to us this year. We've only had a few days over 80°F. And, to make matters worse, we vacationed in Olympic National Park in Washington where, if you believe most of my pictures, we were on a winter vacation. It wasn’t quite as bad as my pictures would lead you to believe, but I told my family we were going to vacation somewhere warm next year! I’m thinking of booking a trip to one or two of the national parks in Utah. Maybe we will be assured of warm weather then.
The 4th of July was quiet for us this year. We usually throw a big party on the 4th, but Les had to work, so we held a smaller barbeque on the 2nd. Our friend Janet invited us over to their place to see the fireworks on the 4th, so my son and I headed over after dinner to join them, and it was great fun!
The neighbors put on an impromptu fireworks display in the street before the big fireworks started, and Janet brought out these delicious sweet treats to tempt us away from our diets. I tried to resist, but I love toffee, and these had some of the same flavors. I’m pleased to say, Janet sent me home with the recipe, so I could make them myself.
I can’t believe how easy this chocolate toffee bark is to make, but they taste like you’ve been making candy for hours.
Chocolate Toffee Bark
Adapted from www.rachaelray.com
12 to 16 whole graham crackers
1 cup packed brown sugar
1 cup unsalted butter (2 sticks)
1 12 oz bag semi-sweet chocolate chips
chopped pecans, toasted
Preheat oven to 350°F.
Line a 15 X 9 baking sheet with parchment paper. Grease the parchment paper or spray with non-stick cooking spray. Line the baking sheet with graham crackers breaking crackers as needed to cover the baking sheet completely.
In a small saucepan, melt butter and brown sugar over medium heat. Stir constantly until mixture boils and thickens. The mixture should have a caramel texture. Pour the caramel mixture over the graham crackers and spread so it covers the crackers completely.
Place graham cracker and caramel into the oven and bake until the mixture bubbles, about 2 to 4 minutes. Remove from the oven and sprinkle chocolate chips over the top. Place back into the oven to soften the chocolate chips, about 1 minute. Spread the chocolate chips over the caramel, and sprinkle with chopped pecans. Place the baking sheet in the freezer for at least an hour or until the mixture is completely cool. Remove from the freezer and break into pieces. Keep bark in the refrigerator to keep the chocolate firm.
Thursday, March 18, 2010
Peanut Butter and Jelly Cookies
Who doesn’t love the flavor of peanut butter and jelly? My mom says I would only eat peanut butter and jelly sandwiches for lunch when I was in first and second grade. And, it remained my lunch of choice during much of my elementary school years. I wish my son’s lunches were so easy! I’ve outgrown my love of peanut butter and jelly sandwiches for lunch, but I haven’t outgrown my love of peanut butter and jelly. I now love the same flavors in my cookies. I added raspberry jam to my favorite peanut butter cookie, and I was transported back to first grade!
Peanut Butter and Jelly Cookies
½ cup butter
½ cup chunky-style peanut butter
½ cup granulated sugar
½ cup firmly packed light-brown sugar
1 egg
1¼ cup all-purpose flour
½ teaspoon baking powder
¾ teaspoon baking soda
¼ teaspoon salt
¼ cup chopped peanuts
granulated sugar
½ cup raspberry jam
Preheat oven to 375°F. Line three baking sheets with parchment paper. In a large bowl, combine butter, ½ cup granulated sugar, brown sugar, egg, vanilla and chopped peanuts, and mix thoroughly. In a medium bowl, mix flour, baking powder, baking soda and salt. Add the flour mixture to the peanut butter mixture and mix until combined. Chill dough about 3 hours or overnight. Roll dough into 1-inch balls, and roll the balls into granulated sugar. Place 3 inches apart on the prepared baking sheets. Press the top of a wooden spoon gently into the dough to create a small indentation. Bake the cookies for 9 minutes. Remove the baking sheets from the oven and place ½ teaspoon of jam in the small indentation. Bake the cookies for another 1 to 2 more minutes or until the cookies are slightly brown and the jam is set. Makes 36 cookies.
Sunday, January 24, 2010
Cranberry Upside-Down Cake
Now that I’m an adult time seems to fly by more quickly every year. This past year was no different, and I can’t believe I’ve been blogging for a year now. I had wanted to celebrate this anniversary with more pomp and circumstance, but I didn’t have the energy. I have been under the weather for over a week.
I did manage to bake a cake today. Not your typical rich frosted birthday cake, but a cake that is more like a pie masquerading as snack cake. The cranberry topping is fruity and tart with the cake adding a slight sweetness. I was inspired to make this cake by a picture of a Cranberry Upside-Down Cake by Alice Waters in Eating Well. Alice’s topping looked good, but her cake seemed fussy. I liked the Apple Upside-Down Cake I made from Cook's Illustrated, so I changed the recipe to incorporate some of the healthier ingredients in Alice’s cake.
Thursday, January 7, 2010
Apple Upside-Down Cake
Tuesday, October 27, 2009
Fully Loaded Bars
Fully Loaded Bars via Betty Crocker
Monday, June 22, 2009
Chewy, Chunky Blondies
Since I am not going to join the TWD group, I can post this recipe for Chewy, Chunky Blondies out of order. If you like baking at all, I do recommend buying Baking From My House to Yours by Dorie Greenspan. The recipes are beautifully photographed and the recipes I've tried are delicious. The Chewy, Chunky Blondies were a big hit in my household. They were sweet and chewy, and just plain delicious. And, in an effort of full disclosure, I have to tell you we enjoyed these brownies without the coconut. I would like to say I left the coconut out on purpose, but that would not be true. I was proudly placing the blondies into the oven, when I turned around and saw the package of coconut on the counter unopened. AUGH! The blondies were good despite my mistake, but I can't wait to try them with the coconut.
Chewy, Chunky Blondies
Recipe by Dori Greenspan Baking From My House to Yours
2 cups all-purpose flour
¾ teaspoon baking powder
½ teaspoon baking soda
½ teaspoon salt
2 sticks of unsalted butter, at room temperature
1 ½ cups packed light brown sugar
½ cup sugar
2 large eggs
1 teaspoon pure vanilla extract
1 cup bittersweet chocolate chips
1 cup Heath Toffee Bits
1 cup coarsely chopped walnuts, toasted
1 cup sweetened shredded coconut
Preheat the oven to 325° F, and butter a 9-x-13-inch baking pan, and put it on a baking sheet. Whisk together the flour, baking powder, baking soda and salt.
Using a stand mixer or a hand mixer beat the butter on medium speed until smooth and creamy. Add the sugars and beat for another 3 minutes, and then add the eggs one by one beating for 1 minute after each egg. Reduce the mixer speed to low and add the dry ingredients mixing just until combined. Using a rubber spatula, stir in the chips, toffee bits, walnuts and coconut. Scrape the batter into the prepared pan, and bake for 40 minutes or until a knife inserted into the center of the blondies comes out clean. Once baked, transfer the pan to a cooling rack and cool for about 15 minutes. Turn the blondies out onto another rack and cool completely. Makes about 32 2¼ by 1½ inch bars.
Thursday, March 5, 2009
Apple Tart
The Apple Tart Cake Molly featured on her blog was perfect for my friend’s birthday last week. I can see why Molly had a hard time describing the dessert. She couldn't decide whether it was cake or a tart. It seemed more like a tart than a cake to me. The crust was cookie like in its texture, and the apples were soft and sweet on top of the crust.
The tart was easy enough to pull together on a weeknight, but the result was like a weekend dessert. And, everyone at work raved about it. My husband and kids were disappointed they didn’t get a chance to have any, so I will have to make the tart again. Please…like it’s going to be a hardship to make this lovely tart again! I can’t wait.
Thursday, February 26, 2009
I Love Lemon!
Next time I make this cake, I will poke holes with a skewer in the top of the cake, so when I pour the lemon syrup over the cake, it will sink into the cake rather than puddle on the cookie sheet beneath the cake. When I made the cake this time, the syrup sank into the very top of the cake where there was a slight split. That spot was the best part of the cake. The glaze and the syrup intersected for a moist, tart and sweet bite.
Lemon Cake
½ pound unsalted butter at room temperature
2 cups granulated sugar
4 large eggs at room temperature
1/3 cup grated lemon zest (6 to 8 large lemons)
3 cups all-purpose flour
½ teaspoon baking powder
½ teaspoon baking soda
1 teaspoon kosher salt
¼ cup freshly squeezed lemon juice
¾ cup buttermilk at room temperature
1 teaspoon pure vanilla extract
Lemon Syrup
½ cup lemon juice
½ cup granulated sugar
Lemon Glaze
2 cups confectioners sugar, sifted
3 ½ tablespoons freshly squeezed lemon juice
Preheat the over to 350°. Grease, flour and line the bottom of two loaf pans with parchment paper.
Cream the butter and sugar in an electric mixer with a paddle attachment for about 5 minutes. Then add the eggs, one at a time, and then add the lemon zest.
Sift together the flour, baking powder, baking soda, and salt in a bowl. In another bowl, combine ¼ cup lemon juice, the buttermilk and vanilla. Add the flour and buttermilk mixtures alternately to the batter, beginning and ending with the flour. Divide the batter between the two pans, smooth the tops and bake for 45 minutes to an hour, or until cake tester comes out clean.
Combine ½ cup granulated sugar with ½ cup lemon juice in a small saucepan and cook over low heat until the sugar dissolves.
After the cakes are done, let them cool for 10 minutes, then take them out of the pans and onto a cooling rake over a tray. Poke holes in the cake with a skewer. Pour the lemon syrup over the cakes slowly. Allow the cakes to cool completely.
Once the cakes are cool, whisk confectioners sugar and the lemon juice until smooth. Pour over the top of the cakes, and let drizzle down the sides.
In my next foray with lemon, I used Smitten Kitchen’s Whole Lemon Tart recipe. This tart got mixed reviews from my audience. I made it on a weeknight, and brought it into work the next day; although, my family implored me to leave some at home, which of course I did. Most of my co-workers said they liked the tart, but I’m not sure if they were just being nice. One co-worker told me the tart wasn’t her favorite, and she didn’t mind telling me since the recipe wasn’t my original recipe. I wasn’t insulted. I liked to hear her honest feedback. I thought the tart was tasty. It was not as sweet as lemon bars, but the texture was close. I liked the flavor of the tart, but I didn’t enjoy chewing on the bits of lemon not pulverized by the food processor. I will probably make this tart again, but the next time I do, I will pulse the filling in the food processor longer. My love for lemon is undimmed!
Whole Lemon Tart
from Smitten Kitchen
1 partially baked 9-inch (24-cm) Great Unshrinkable Tart Shell, or your favorite sweet tart shell
1 average-sized Meyer lemon (about 4 1/2 ounces; 130 grams), you can use a regular lemon, but it will not be as sweet.
1 1/2 cups sugar
1 large egg
1 large egg yolk
1 1/2 tablespoons cornstarch
1 stick unsalted butter, melted and cooled
Preheat the oven 325°. Put the tart shell on a baking sheet. Slice the lemon into thin pieces, and remove the seeds. Add the lemon and sugar into the food processor. Pulse the lemon and sugar mixture in the food processor, scraping down the sides of the container as needed, until the lemon is thoroughly pureed and blended with the sugar, 1 to 2 minutes. Pour the mixture into a bowl and, wisk in the whole egg and the yolk, followed by the cornstarch and melted butter. Pour the filling into the crust but be sure to leave 1/4 inch between the top of your filling and the top edge of your crust.
Slide the baking sheet into the oven and bake the tart for 20 minutes. Increase the oven temperature to 350° and bake for another 15 to 20 minutes, or until the filling is bubbling, lightly browned and set. Don’t take the tart out until it is clearly set, however — you’re looking for a slight jiggle only. Transfer the tart, still on the baking sheet, to a cooling rack and allow it to cool for at least 20 minutes before removing it from the pan. Serve the tart at room temperature.
Monday, February 9, 2009
Fundraiser Planning Dinner
I am still obsessing about homemade ricotta, so I decided Bon Appetit’s Fig and Onion Bruschetta would be the appetizer for the evening. Fine Cooking’s ricotta recipe was better tasting, but this one was really easy. Once the ricotta was made, I moved on to making the other toppings. This recipe frustrated me. The ingredient list is on one page and the instructions are on another page, so I had to constantly go back and forth between the pages (a small pet peeve of mine). Everyone liked these, but you really needed every ingredient in each bite for the full effect. Don’t omit the oregano. It was surprisingly important in the final taste.
Terrina di Cioccolato Bittersweet Chocolate Terrine
9 oz. bittersweet chocolate (70% cocoa), chopped
7 Tablespoons butter
½ cup plus 2 Tablespoons sugar
4 egg yolks
Pinch of salt
1/3 cup cocoa powder
1 ¼ cups cream
1 Tablespoon plus 1 ½ teaspoon powdered sugar
1 Tablespoon liqueur*
1 Tablespoon hot water
Spray loaf pan with Pam and line with plastic wrap. Make sure there is at least 2 inches overhang all the way around. Lightly spay the inside with Pam.
Whip cream with powdered sugar to medium peaks: set aside and chill.
Microwave chocolate and butter on medium power at 30 second intervals, stirring occasionally until completely melted. Sift in cocoa and whisk until smooth; set aside. Whip yolks, sugar and salt together over a simmering bain marie until pale yellow and very thick. Whisk in liqueur and water, then melted chocolate.
Fold cream into chocolate mixture a third at a time. Fill loaf pan an gently pang out any air bubbles. Fold plastic over the top to cover the chocolate mixture. Freeze until set.
Mimi at Palio used Amaretto and folded in 1/3 cup of chopped torrone. I used Grand Marnier and I didn’t use torrone, because I was making this dessert for someone allergic to nuts. Both liqueurs were delicious, but I prefer the amaretto.
Subscribe to:
Posts (Atom)


